Post by JerryB on Mar 16, 2016 4:28:47 GMT -5
Hi
I have posted this document that I wrote on other boards. This version is a revised version of those posts.
Collectors today use the stamp mounts that are currently available. Personally, I have used Showgard mounts for 20+ years. Anyone using the mounts usually make mistakes in their use, including myself. This write up, hopefully, corrects those mistakes. The tips are based on my experience and those of Vidiforms (Showgard).
The following Mount tips apply to any of the stamp mounts that are available, both
“split-back” (Showgard, Scott, etc.) and “Open Top” (Hawid) mounts.
1. Cutting A Mount to Size
a. Mount Height
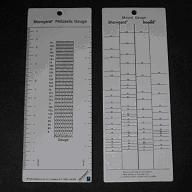
• When selecting the mount height, select a height that does not “squash” the item
in the mount. If need be, select the next higher size. However, there are times
that one has to use a mount with the split vertical in order to get the right size. I
have never had an item fall out when using it this way. Below is shown the
Showgard Philatelic Gauge for measuring mount height.

• If the gauge cannot be found, measure the height of the item in mm (millimeters).
If a stamp, measure perf tip to perf tip. This should be the height required but
one may have to select the next higher size.
b. Mount Width
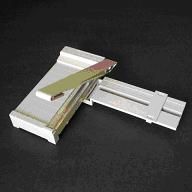
• To cut a mount strip to length a guillotine is recommended. Many styles and sizes are
available and do an excellent job. For those guillotines that have a “ruler bar”,
such as Showgard EXCAL guillotine shown, place the bar at the bottom of the
“cutting board”. The guillotine directions show the bar at the top but I have found it more
convenient, and more accurate, to put the bar at the bottom. These cutters give the mount
a nice clean look rather than raggedy edges that one may get using other methods. The
cutters are a little expensive but they last for years.
Note: Showgard has replaced the Excal cutters with a newer model. Any comments on the
model will be appreciated.

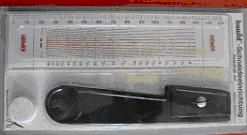
• For mounts that are larger than the capacity of the guillotine try to find the
following HAWID item. It still exists and will help cutting larger mounts neatly.

• To determine the width of the mount measure the stamp perf tip to perf tip
in millimeters and add 3 mm to get the final width. The extra 3 mm tends
to make the border around the item look equal since the 2 mount welds are
approximately 3 mm.
• Warning: Never cut a mount to size with the stamp in the mount. An exception may be
cutting larger mounts with the ruler cutter shown above as the ruler has a guideline.
2. Attaching the Mount To a Page
• The most important “rule” of ALL:
DO NOT moisten the mount with the stamp in the mount.
• DO NOT LICK the mount. Moisture may creep in at the mount edges. Use a
damp cotton swab like a Q-Tip (may be called a Cotton Bud outside the US).
 • Dip the swab in water and roll the swab in your fingers, or use some other
method, to remove most of the water. The swab should only be damp. If using
your fingers you may want a towel nearby to dry your fingers.
• Apply a little moisture ONLY to the top third of the mount. You do not have
to wet the entire back.
• When applying moisture, use 2 or 3 dabs of the swab. If wetting the entire
width, moisten from the middle of the mount to the left or right edge. This
will reduce the chance of moisture creeping into the mount.
• If moisture does creep in at an edge, take a small piece of torn paper and
use the ragged paper edge as a "blotter".
• Attach the mount to the page.
• Put the item into the mount ONLY after it is fully dried.
• To insert the item place the item into the mount at the top and gently roll
the mount bottom over the item bottom.
• With large items you may want to put a dab of moisture at the bottom of the
mount and press to the page. This prevents large mounts from “flapping in
the breeze”.
Revised: March 13, 2016
Jerry B
I have posted this document that I wrote on other boards. This version is a revised version of those posts.
Collectors today use the stamp mounts that are currently available. Personally, I have used Showgard mounts for 20+ years. Anyone using the mounts usually make mistakes in their use, including myself. This write up, hopefully, corrects those mistakes. The tips are based on my experience and those of Vidiforms (Showgard).
The following Mount tips apply to any of the stamp mounts that are available, both
“split-back” (Showgard, Scott, etc.) and “Open Top” (Hawid) mounts.
1. Cutting A Mount to Size
a. Mount Height
• When selecting the mount height, select a height that does not “squash” the item
in the mount. If need be, select the next higher size. However, there are times
that one has to use a mount with the split vertical in order to get the right size. I
have never had an item fall out when using it this way. Below is shown the
Showgard Philatelic Gauge for measuring mount height.

If a stamp, measure perf tip to perf tip. This should be the height required but
one may have to select the next higher size.
b. Mount Width
• To cut a mount strip to length a guillotine is recommended. Many styles and sizes are
available and do an excellent job. For those guillotines that have a “ruler bar”,
such as Showgard EXCAL guillotine shown, place the bar at the bottom of the
“cutting board”. The guillotine directions show the bar at the top but I have found it more
convenient, and more accurate, to put the bar at the bottom. These cutters give the mount
a nice clean look rather than raggedy edges that one may get using other methods. The
cutters are a little expensive but they last for years.
Note: Showgard has replaced the Excal cutters with a newer model. Any comments on the
model will be appreciated.

following HAWID item. It still exists and will help cutting larger mounts neatly.

• To determine the width of the mount measure the stamp perf tip to perf tip
in millimeters and add 3 mm to get the final width. The extra 3 mm tends
to make the border around the item look equal since the 2 mount welds are
approximately 3 mm.
• Warning: Never cut a mount to size with the stamp in the mount. An exception may be
cutting larger mounts with the ruler cutter shown above as the ruler has a guideline.
2. Attaching the Mount To a Page
• The most important “rule” of ALL:
DO NOT moisten the mount with the stamp in the mount.
• DO NOT LICK the mount. Moisture may creep in at the mount edges. Use a
damp cotton swab like a Q-Tip (may be called a Cotton Bud outside the US).

method, to remove most of the water. The swab should only be damp. If using
your fingers you may want a towel nearby to dry your fingers.
• Apply a little moisture ONLY to the top third of the mount. You do not have
to wet the entire back.
• When applying moisture, use 2 or 3 dabs of the swab. If wetting the entire
width, moisten from the middle of the mount to the left or right edge. This
will reduce the chance of moisture creeping into the mount.
• If moisture does creep in at an edge, take a small piece of torn paper and
use the ragged paper edge as a "blotter".
• Attach the mount to the page.
• Put the item into the mount ONLY after it is fully dried.
• To insert the item place the item into the mount at the top and gently roll
the mount bottom over the item bottom.
• With large items you may want to put a dab of moisture at the bottom of the
mount and press to the page. This prevents large mounts from “flapping in
the breeze”.
Revised: March 13, 2016
Jerry B


